Mesh Generation and Editing at Runtime in UE4.26
/In my last tutorial, I showed you how to use the new experimental GeometryProcessing plugin in UE4.26 to do useful meshy things like mesh generation, remeshing, simplification, and Mesh Booleans (zomg!). When people first learn that we are building these capabilities in Unreal, one of their immediate questions is usually “Can I use it in a game?”. The short answer is, yes. However there is no Blueprint API to that plugin, so there are some hoops to jump through to do it.
A related question that comes up very frequently is how to implement runtime mesh creation in a UE4 game or application. UProceduralMeshComponent (API docs link) is historically how one would do such a thing in Unreal Engine. As of UE4.25, it is now also possible to “build” and update a UStaticMesh at Runtime, which can then be used in UStaticMeshComponent/Actor. So we now have a new question, which one should you use? In addition, there are third-party solutions like RuntimeMeshComponent (link) that provide more functionality than UProceduralMeshComponent and might be a better choice in some situations. (For the rest of this tutorial I am going to abbreviate UProceduralMeshComponent as PMC and UStaticMesh/Component as SMC, to save my fingers).
Unfortunately there is no “best” option - it depends on what you need. And it’s not immediately obvious how to hook any of them up to our GeometryProcessing plugin, which uses FDynamicMesh3 to represent meshes without any connection to Components or Actors. So, in this tutorial I will show you one way to implement runtime-generated-and-edited meshes that will work with any of these options.
The video above-right shows a small “runtime geometry gym” demo that I built using the Actors and utility code in this tutorial. As you can see there are Booleans, mesh operations, and some spatial-query demos. These are just a few things I exposed via Blueprints (BP), and by the end of this tutorial you should understand how it is very straightforward to expose other GeometryProcessing-based mesh editing code on the ADynamicMeshBaseActor I will describe below.
(Mandatory Disclaimer: your author, Ryan Schmidt, is an employee of Epic Games. However, gradientspace.com is his personal website and this article represents his personal thoughts and opinions. About triangles.)
Translation for Chinese Users: https://zhuanlan.zhihu.com/p/345724236
Getting and Running the Sample Project
Before we begin, this tutorial is for UE 4.26, currently in Preview release (Preview 4 at time of writing). You can install the Preview binaries from the Epic Games Launcher.
The project for this tutorial is on Github in the UnrealMeshProcessingTutorials repository (MIT License), in the UE4.26/RuntimeGeometryDemo subfolder. Unfortunately in UE4.26 this project will only work on Windows. It should be possible to get this tutorial working on OSX or Linux with some selective deleting, I will describe this at the end of the post. If you don’t want to check out with git, you can grab a zip of the current repository.
Once you are in the top-level RuntimeGeometryDemo folder, right-click on RuntimeGeometryDemo.uproject in Windows Explorer and select Generate Visual Studio project files from the context menu. This will generate RuntimeGeometryDemo.sln, which you can use to open Visual Studio. You can also open the .uproject directly in the Editor (it will ask to compile), but you probably will want to refer to the C++ code for this tutorial.
Build the solution and start (press F5) and the Editor should open into the sample map. You can test the project in PIE using the large Play button in the main toolbar, or click the Launch button to build a cooked executable. This will take a few minutes, after which the built game will pop up in a separate window. Run around and shoot the walls! You’ll have to press Alt+F4 to exit as there is no menu/UI.
The Code
There are two sides to this tutorial. First, I will describe an architecture for at-runtime dynamic/editable mesh Actors implemented in C++, and then the sample project that uses these Actors with Blueprints to do interesting things. None of the “game logic” is in C++, just the core functionality. I have put this all a plugin named RuntimeGeometryUtils, which you could easily copy to your own projects. Just to mention up front, in RuntimeGeometryUtils I have also included updated versions of DynamicMeshOBJReader/Writer from my previous tutorial, but I have changed the API to be static functions.
PMC or SMC?
If you are going to set about building dynamic in-game geometry, the immediate question is whether to use UProceduralMeshComponent (PMC) or UStaticMeshComponent (SMC). There are various small differences between these two, but the biggest is in terms of performance. To update a mesh at runtime, it needs to be “built”. By this we meant that the Rendering representation of the mesh needs to be created or updated. Unreal does not directly render from the Sections in a PMC or the FMeshDescription in a SMC. For any UMeshComponent (of which both PMC and SMC are), a FPrimitiveSceneProxy subclass is created which is the rendering representation of the Component. That Proxy will create one or more FMeshBatch from the Component data.
In PMC this is relatively straightforward and I would suggest you just go skim the code that does it in ProceduralMeshComponent.cpp, the FProceduralMeshSceneProxy class is at the top. You will see that in the constructor, FProceduralMeshSceneProxy converts the FProcMeshSection’s that you create externally and initializes a FStaticMeshVertexBuffers and FLocalVertexFactory. These store things you would expect the GPU to need, like vertex positions, triangle index buffer, Normals and Tangents, UVs, Vertex Color, etc. To the GPU this data is not different between a PMC or SMC, the only difference is how it gets there.
SMC is much more complex. I am playing a bit loose with terminology here, because a UStaticMeshComponent does not store a mesh itself - it references a UStaticMesh, and the UStaticMesh stores the mesh. Until UE4.25 it was not possible to update a UStaticMesh at runtime. This is because traditionally your “source mesh” in the Unreal Editor, stored as a FMeshDescription inside UStaticMesh, is “cooked” into a preprocessed, optimized “rendering mesh” that is used to initialize the FStaticMeshSceneProxy (done in StaticMeshRender.cpp). The source FMeshDescription is not used after cooking, so it is stripped out in your built game. This cooking process, kicked off by UStaticMesh::Build(), depends on various Editor-only functions and data, and that’s why you couldn’t update the UStaticMesh geometry at runtime.
But, in 4.25 a new function was added - UStaticMesh::BuildFromMeshDescriptions(). This function takes a list of FMeshDescriptions and initializes the rendering mesh data, allowing a UStaticMesh to be built at runtime. This build is not the same as the Editor-only ::Build() path - it skips various complex steps that are too slow to do at runtime (eg build Distance Field Lighting data) or not useful (eg generate lightmap UVs, which would be useless as you can’t bake new lightmaps at runtime).
Calling BuildFromMeshDescriptions() is more expensive than updating Sections in a ProceduralMeshComponent. The trade-off is that you can re-use the generated UStaticMesh in multiple StaticMeshComponents (and may even get instanced rendering), while if you want to have multiple of the “same” PMC, you need to copy the mesh into each one. In addition you get extra rendering features with SMC. For example the FProcMeshVertex used in the PMC only supports 4 UV channels, but a UStaticMesh supports up to 7. UStaticMesh also supports LODs and Sockets, and generally SMC is better-supported throughout the Engine.
One more fundamental difference has to do with how these different types use the renderer. PMC uses what’s called the “Dynamic Draw” path, which means it rebuilds and re-submits FMeshBatches every frame. This basically tells the renderer “my vertex/index buffers might change at any frame, so don’t bother caching anything” and this has a peformance cost. SMC uses the “Static Draw” path, which tells the renderer that the render buffers are not going to be changing and so it can do more aggressive caching and optimization. If you are interested in more details here, Marcus Wassmer gave an excellent GDC 2019 talk on the current UE4 Rendering Pipeline..
These are not the only differences, however in terms of at-runtime generated meshes, this is the core trade-off. SMC will give you better rendering performance but has a higher up-front cost. So if you are just loading generated meshes, or are “done” dynamically editing or changing a mesh, you will benefit from building it as an SMC. But if you are actively changing a mesh, you will really suffer if you are updating a SMC every frame. As a simple test, I used the infrastructure I will describe below to re-generate a sphere every frame, at “tessellation level 32”, which generates 2046 triangles and 1025 vertices. Using PMC this runs at 90-100fps in PIE. With SMC it drops down to 30fps. If I crank up the tessellation to 128 (32k triangles), it’s still hitting about 15fps with PMC, while with SMC it’s an unworkable 3fps.
A Third Option: USimpleDynamicMeshComponent
Having to deal with two different Components does make things complicated…and I’m about to make it worse! PMC has a fundamental limitation in that it cannot have split normals, UVs, or other attributes at a vertex. So if you have a cube with connected mesh topology - ie it has no boundary edges - but 3 normals at each corner vertex, or a separate UV chart/island for each face, you have to split that cube up into 6 rectangles before you initialize the PMC. This is because the PMC wants to be as efficient as possible at initializing the RenderProxy, and the GPU doesn’t support split-anything. Splitting up vertices and rewriting triangle indices is complicated and would make the PMC API much more complex, so you have to do it yourself.
But, this means that the PMC is not suitable to directly use for any kind of mesh editing. For example lets say you want to plane-cut a cube and fill the cut surface. Well, if you were to try to cut the PMC sections directly, you don’t actually have a cube, you have 6 disconnected triangle patches. So now instead of getting a closed boundary loop after the cut, which is ideal for hole-filling, you get some 3D lines that need to be chained up to identify the hole. This is all very bad for editing reliability. Similarly if you pull on a “cube” corner, you’re just going to create a crack. I could go on…just trust me, it’s a nightmare.
So, to implement the Mesh Modeling Editor Mode in UE 4.25, we introduced another type of mesh Component, USimpleDynamicMeshComponent. This component is like a PMC in that it uses the Dynamic Draw path and is designed to be fast to update. However unlike the PMC, it stores a more complex mesh representation that supports split-attributes at vertices, and internally handles rewriting that mesh as something suitable for the GPU. And what is this more complex mesh representation? It’s a FDynamicMesh3 of course.
(Why “Simple”? Because there is another variant - UOctreeDynamicMeshComponent - that is designed for efficiently updating sub-regions of huge meshes. That one is beyond the scope of this tutorial.)
USimpleDynamicMeshComponent (let’s call it SDMC) has many features that PMC lacks that are nice for interactive mesh editing situations. For example it supports overriding the material on a subset of triangles, or hiding them, without re-structuring the mesh. It also has various functions for “fast updates” of the different rendering buffers, for example if you only changed vertex positions, colors, or normals. It also supports “chunking” the mesh into multiple render buffers for faster updating, and can auto-compute tangents on mesh updates. We won’t be using any of these capabilities in this tutorial.
In terms of trade-offs, SDMC will generate larger render buffers than PMC. So, if GPU memory in your dynamic-geometry-game is a concern, it may not be the best choice. In interactive-mesh-editing contexts, this memory usage will generally pale in comparison to the many mesh copies and ancillary data structures you will need, though. SDMC also does not currently have any Physics support. And finally it cannot be serialized - you should only use SDMC in contexts where your generated mesh is saved some other way.
Runtime Geometry Architecture and ADynamicMeshBaseActor
Ok, so now we have 3 options - SMC, PMC, and SDMC. Each stores the mesh in a different way (FMeshDescription, FProcMeshSection, and FDynamicMesh3). Which one should we use? Let’s choose all of them!
The core architectural question is, where is your generated mesh coming from? If you are generating it completely procedurally, or just loading it from a file, then you can easily use any of these options, the only question is whether it’s static after being generated, frequently updated, or you want to have the convenience of not having to build sections yourself.
If you need to change the meshes after they are generated, then I strongly recommend you do not think of the mesh representation inside any of these Components as the canonical representation of your application’s data model. For starters, none of them will serialize your mesh data. And you probably have additional metadata beyond just the mesh vertices and triangles, that you would like to keep track of (and even if you don’t yet, you probably will eventually). So, I think the way you should think of the different Components is strictly as different ways to render your mesh data.
In this tutorial, “my mesh data” will be stored as FDynamicMesh3. This is a good choice if you don’t have your own mesh, in my opinion. However do know that currently there is no native serialization for FDynamicMesh3, you will need to implement that yourself. The next question is where to put this data. I am going to have it live on a C++ Actor class, ADynamicMeshBaseActor. If I were building a real app, say a mesh sculpting tool, I would probably have the mesh live in some other place, and just pass it to the ADynamicMeshBaseActor when it is modified. But for now I will have it live directly on the Actor:
UCLASS(Abstract)
class RUNTIMEGEOMETRYUTILS_API ADynamicMeshBaseActor : public AActor
{
protected:
    /** The SourceMesh used to initialize the mesh Components in the various subclasses */
    FDynamicMesh3 SourceMesh;
};
This Actor has no way to display this mesh, it needs a Component. Rather than have to make a choice, I’m going to make 3 Actor subclasses, one for each type of mesh Component:
UCLASS()
class RUNTIMEGEOMETRYUTILS_API ADynamicSMCActor : public ADynamicMeshBaseActor
{
    UPROPERTY(VisibleAnywhere)
    UStaticMeshComponent* MeshComponent = nullptr;
};

UCLASS()
class RUNTIMEGEOMETRYUTILS_API ADynamicPMCActor : public ADynamicMeshBaseActor
{
    UPROPERTY(VisibleAnywhere)
    UProceduralMeshComponent* MeshComponent = nullptr;
};

UCLASS()
class RUNTIMEGEOMETRYUTILS_API ADynamicSDMCActor : public ADynamicMeshBaseActor
{
    UPROPERTY(VisibleAnywhere)
    USimpleDynamicMeshComponent* MeshComponent = nullptr;
};
Now on the ADynamicMeshBaseActor we are going to have the following function, which has no implementation (but cannot be C++-abstract, ie = 0, because UE does not support that on UObjects):
protected:
    /**
     * Called when the SourceMesh has been modified. Subclasses override this function to
     * update their respective Component with the new SourceMesh.
     */
    virtual void OnMeshEditedInternal();
Finally we implement this function in each of the subclasses. Essentially what each of those functions has to do, is generate and update their Component’s mesh data from the FDynamicMesh3. In the file MeshComponentRuntimeUtils.h I have added converter functions to do this, UpdateStaticMeshFromDynamicMesh() and UpdatePMCFromDynamicMesh_SplitTriangles(). The former uses the FDynamicMeshToMeshDescription class, part of GeometryProcessing, to do the conversion. For the PMC the function currently just splits each triangle. This is not the most efficient in terms of GPU memory, but is the fastest on the CPU side (in interactive mesh editing we tend to focus on the CPU side, as that’s generally the bottleneck).
For SDMC, it’s just a straight copy into the Component. Note that the SDMC does support directly editing it’s internal FDynamicMesh3. If I was cleverer, I could have allowed the base-class to access this mesh and sometimes avoid a copy. However, then I would not be using the Component-owned data as my canonical Source Mesh, which I said above was a bad idea. In some performance-sensitive situations it might make sense, but FDynamicMesh3 is very fast to copy and so just to keep things clean, I didn’t do it here.
Finally, we have one top-level API function on ADynamicMeshBaseActor that we use to actually modify the SourceMesh:
/**
 * Call EditMesh() to safely modify the SourceMesh owned by this Actor.
 * Your EditFunc will be called with the Current SourceMesh as argument,
 * and you are expected to pass back the new/modified version.
 * (If you are generating an entirely new mesh, MoveTemp can be used to do this without a copy)
 */
virtual void EditMesh(TFunctionRef<void(FDynamicMesh3&)> EditFunc);
Basically you call this function with a C++ lambda that does your actual edit. This pattern allows us to better control access to the SourceMesh, so we could in theory do things like “borrow” it from somewhere else. Another function, ::GetMeshCopy(), allows you to extract a copy of the SourceMesh from the Actor, which is needed in cases where you want to combine two meshes, for example.
And that’s basically it. If we have an instance of any of the 3 ADynamicMeshBaseActor subclasses above, we can update it in C++ by doing something like the following:
SomeMeshActor->EditMesh([&](FDynamicMesh3& MeshOut)
{
    FDynamicMesh3 NewMesh = (...);
    MeshOut = MoveTemp(NewMesh);
});
and the underlying PMC, SMC, or SDMC will be automatically updated.
One valid design question here is, why is this all done on the Actor, instead of the Component? It could of course be done on the Component too. It’s question of what you intend to do with your meshes. One complication with UE is that one Actor might have many Components, and then if you want to do things like “combine meshes”, you would have to decide how to handle these multiple, possibly hierarchical Components, some of which might not be your editable meshes. And what happens to the Actors if the Components are your primary “thing”? (These are conceptual problems we continue to struggle with in the design of the Modeling Editor Mode!!). For this tutorial I want to think of each mesh as an “object” and so organizing via Actors made sense. In addition, Actors have blueprints and this will make it easier to do fun things below.
Mesh Generation
Unfortunately our current ADynamicMeshBaseActor won’t do anything interesting in the Editor unless we initialize it in C++. So I have added some basic mesh generation functionality to it. A top-level UProperty SourceType determines whether the mesh is initialized with a generated primitive (either a box or sphere), or an imported mesh in OBJ format. The relevant sections of the Actor properties are shown below (click to enlarge). I also added the ability to control how Normals are generated, what Material is assigned to the underlying Component, and additional options for the Generation and Import. In addition there are options to enable automatic building of an AABBTree and FastWindingTree, which I will discuss below.

One note on the “Imported Mesh” option - the import path can either be a full C:\-style path, or a path relative to the project Content folder. I have included the Bunny.obj mesh with the project. This mesh will be included in the packaged build because I have added the SampleOBJFiles folder to the “Additional Non-Asset Directories to Copy” array in the Project Settings under Project - Packaging.
With these additions, we now have fully dynamic generated and imported meshes. If you open the Editor, you can find ‘Dynamic SMCActor”, as well as the PMC and SDMC actors, in the Place Actors panel (via the search box is easiest), drop one into the scene, and then change it’s parameters in the Actor DetailsView and the mesh will update, as shown in the short clip above-right.
Blueprint API
The final part of ADynamicMeshBaseActor is a small set of UFunction’s for executing mesh import/copy, spatial queries, booleans, solidification, and simplification. These are all marked BlueprintCallable and I will explain them in more detail below. But let’s look at the code for one of them, just to see what it’s like:
void ADynamicMeshBaseActor::CopyFromMesh(ADynamicMeshBaseActor* OtherMesh, bool bRecomputeNormals)
{
    // the part where we generate a new mesh
    FDynamicMesh3 TmpMesh;
    OtherMesh->GetMeshCopy(TmpMesh);

    // apply our normals setting
    if (bRecomputeNormals)
    {
        RecomputeNormals(TmpMesh);
    }

    // update the mesh
    EditMesh([&](FDynamicMesh3& MeshToUpdate)
    {
        MeshToUpdate = MoveTemp(TmpMesh);
    });
}
This is a simple function, but the point is that you can basically cut-and-paste this function, rename it, and plug any GeometryProcessing code in at “the part where we generate a new mesh”, and you’ll have access to that operation in Blueprints. The other BP API functions that apply mesh updates all do exactly that. A useful exercise would be to add the a Remesh() function by cutting-and-pasting the remeshing call from the Command-Line Geometry Processing Tutorial.
The Project
Then RuntimeGeometryDemo project has a single map, AA_RuntimeGeometryTest, with 4 “stations”. Each area does something different with runtime geometry based on the BP API I have added to ADynamicMeshBaseActor. From right-to-left we have a boolean operation, mesh simplification/solidification, spatial queries, and then another boolean demo where you get to chew away at some blocks!
The embedded video at the top of the tutorial shows a quick run-through of the different stations. We’ll walk through them in detail below.
Booleans!
In the first area, there are two dynamic mesh actors (both SMC in this case, but it doesn’t really matter). The red sphere is animated, and when you step on one of the three buttons on the ground labeled Union, Difference, and Intersection, that Boolean operation will be applied to these two objects, and the sphere will be deleted. The Blueprint Actor BP_ApplyBooleanButton is where the action is, and is shown below. Basically when you overlap the respective green box, it changes material, then we get both the Target and ‘Other’ Actors and call ADynamicMeshBaseActor::BooleanWithMesh(Target, Other). Then the Other Actor is Destroyed. Easy!
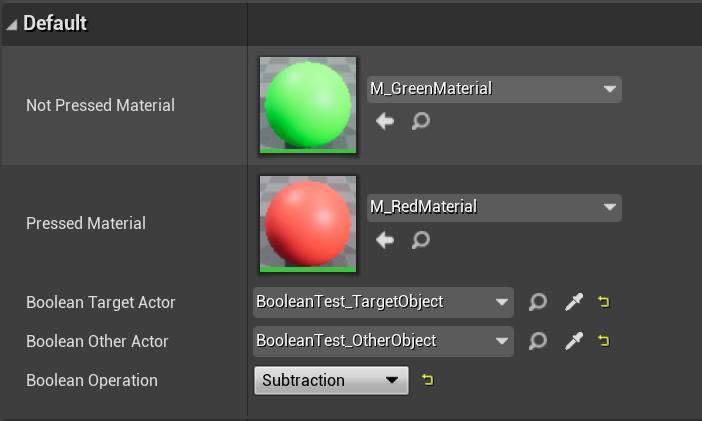
The objects for each station are grouped into a folder, shown for this part below-left. Below-right is the DetailsView properties for the above blueprint on the Button_XYZ actors. Here the various parameters in the Button BP can be configured for each Button Actor instance. Basically, you set the “Target” and “Other” Actors to two mesh actors in the current level, and pick an operation. In addition you can set the “Pressed” and “Not Pressed” materials. The SM_ButtonBox static mesh used in the BP is configured to only register Pawn overlaps, and so the ActorBeginOverlap above will only fire when the player steps on it, and kick off the Boolean operation.
One little BP tip, the “Validated Get” used above to only continue execution if BooleanOtherActor “Is Valid”, can be quickly created by right-clicking on a normal parameter-Get node and selecting ‘Convert to Validated Get’ at the bottom of the context menu. I only learned this after wasting countless minutes wiring up explicit IsValid branches.
Mesh Algorithms!
At the next station you can repeatedly jump or walk on/off the Simplify button to simplify the green Bunny mesh by 50% each time, or step on Solidify to run the Fast Mesh Winding Number-based remeshing. These are both essentially cut-and-pastes of the BP_ApplyBooleanButton, but they don’t take a second Actor. Below I have zoomed in on the relevant “action” section of BP_ApplySimplifyButton.
Spatial Queries!
The third station is not really interactive, although if you get in there and jump at just the right time, you can knock the flying sphere around. There are two objects “attached” to the semitransparent bunny. Neither are our editable mesh actors, they are just normal blueprinted StaticMeshActors, BP_MagnaSphere and BP_RotatoSphere. Their BPs are more complicated, I have shown BP_RotatoSphere below. Basically this one just moves around in a circle (“Then 0” off the Sequence node), moves a little sphere sub-Component to the nearest-point on the Bunny mesh surface (“Then 1” branch) and then changes it’s color depending on whether the StaticMesh’s location is inside or outside the Bunny (“Then 2” branch).
These latter two steps call the ContainsPoint() and DistanceToPoint() functions on the target ADynamicMeshBaseActor. These are just utility functions that query an AABBTree and FastWindingTree built for the SourceMesh automatically, if the bEnableSpatialQueries and bEnableInsideQueries UProperties are true, respectively. Otherwise they will just return false. Building these data structures can be expensive if the mesh is changing every frame, and should be disabled unless they are needed.
There is also a ADynamicMeshBaseActor::IntersectRay() function exposed to BP, which is not used in any of the examples. You might find this capability useful as runtime-generated meshes can’t necessarily be hit by LineTraces. For PMC and SMC it requires runtime physics cooking, which is not fully supported by Chaos and is generally somewhat expensive, and SDMC doesn’t support it at all. In addition ::IntersectRay() is implemented based on the double-precision DynamicMesh3/AABBTree, which can be helpful with huge meshes. (We rebuild AABBTree’s per-frame during many Modeling Mode operations in the Editor, it is not unreasonably expensive in an “editing tool” context.)
The BP_MagnaSphere is similar, except it uses the nearest point to add an impulse to the sphere, basically “attracting” it to the Bunny surface. This sometimes goes flying off into the world, so you might not always see it.
Shoot This!
In the final station, you can left-click to fire spheres at the red and green walls, and the spheres will be Boolean subtracted when they hit the wall. There is no physics involved here, the blueprint below detects the hits using the ADynamicMeshBaseActor::DistanceToPoint() query, between the center of the BP_Projectile actor and the wall mesh. The distance is compared to a fraction (0.25) of the radius of the projective bounding-box - this is the input to the CompareFloat node below. If it’s within range, the projectile sphere mesh is subtracted from the wall, and then destroyed. The red wall is an SDMC and the green wall is a PMC, and the projectile sphere is an SDMC, but the whole point here is it really doesn’t matter in this context.
If you recall from above, after each Subtract operation, the mesh has to be updated and the AABBTree recomputed so that the Distance to Point can be calculated. This might sound slow, but for me it generally runs at 90-100fps in PIE (run ‘stat fps’ in the console to see framerate) even if I’m shooting as fast as I can. This is surprisingly fast (I was surprised!). Turning up the tessellation level on the wall or projectile will have a noticeable effect, and it’s easy to end up getting noticeable hitches. One note, if you just hit ‘play’ and go to the wall, the pulsing red sphere at the first station will still be regenerating every frame, which slows things down (see PMC/SMC discussion above, the red sphere is an SMC). You will notice that shooting is snappier if you disable ‘Regenerate on Tick’ on the red sphere, or jump on one of the Boolean buttons first.
Frequent use of Get All Actors Of Class is not recommended…but it is easy!
Using physics for this kind of thing could be problematic because generally physics collision detection requires “simple collision” geometry, which has to be boxes spheres, capsules, or convex hulls. Decomposing the complex result of a half-blasted wall into those shapes is very difficult (read: slow). “Complex Collision” can also be used, but in that case the collision tests are much more expensive than a single distance-to-point query. A raycast could be used, and in fact I did this initially, but it meant that the ball could easily “go through” tiny holes. The distance threshold makes it “feel” much better (and can be decreased to allow each ball to do more damage). Finally it’s kind of neat to play around with the projectile mesh and/or wall mesh, like I did on the right…
Note that it would also be possible to test for exact overlaps between the two meshes here, too. TMeshAABBTree has a TestIntersection() function that takes a second TMeshAABBTree (and optional transform), and this could easily be exposed in BP, just like DistanceToPoint() is. However in this case, it would mean that the ball might not get a chance to penetrate into the wall before being subtracted (which would also be the case with complex collision). And this function is much more expensive than a simple distance query.
One final note, the BP_Projectile’s are emitted by the Fire() function on ARuntimeGeometryDemoCharacter. This could probably also be done in BP. But note that it is the only code I added to the auto-generated Third Person template project - everything else in C++ was done by the RuntimeGeometryUtils plugin.
What About Collisions?
You will notice if you run the demo that you can run right through any of the runtime-generated meshes, there is no collision. As I described above, the Boolean-gun does not use the collision system, even for line traces. Physics “cooking” is separate from rendering mesh cooking, and support for runtime physics cooking is more complicated. UProceduralMeshComponent does support runtime physics cooking, but currently only with PhysX. The situation is murkier with SMC, since the runtime Build option is very new, it’s not clear that runtime physics cooking will work (and would have the similar PhysX requirement). And SDMC does not support physics at all, as it is meant for fast visualizing during editing, and physics cooking is expensive!
However even if we do want physics, we still have a complication because as I mentioned above, “Simple Collision” is required to support physics simulation (ie things that move) and only allows for spheres, capsules, boxes, and convex hulls. So it’s necessary to approximate a complex object with a set of these simpler shapes for it to be simulated at runtime. This is essentially an unsolved problem to solve well automatically - just look at that wall above riddled with bunny-bullet-hits and imagine trying to split it up into boxes and spheres! The other option is “Complex Collision”, which is limited to static objects (ie that can be collided with but aren’t simulated) and is expensive both to cook and to test for collisions. It will do in a pinch or a prototype, but you probably don’t want to build your game around complex collision.
This is without a doubt a major thorn in the side of any game or app dependent on runtime-generated-geometry. As I have shown, it is possible to implement some physics-like effects without the full physics system. And it would be possible to implement the UPrimitiveComponent LineTrace and Overlap tests against the FDynamicMeshAABBTree, which would allow many things to “just work” (but not physics simulation). Perhaps a topic for a future article!
Late Breaking Update!
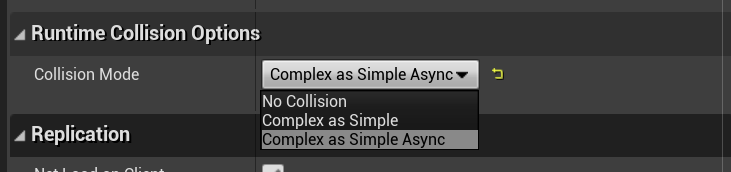
As of UE4.26 Preview 5, the default Physics system has been switched back to PhysX in the binary builds. You can still enable Chaos if you are building from source, and experiment with all the great new features that are coming in the future. However one result of this switch is Runtime Physics Cooking for the UProceduralMeshComponent is available again. So, I have added a Collision Mode field to the ADynamicMeshBaseActor, with options for Complex as Simple and Complex as Simple Async. These options will only currently have an effect on the ADynamicPMCActor, not with the SMC or SDMC. It may be possible to also get this to work with the SMC, I haven’t tried yet myself (maybe you will figure it out and submit a PR!)
The video on the right shows what happens if you switch the BP_ShootableBlock_PMC object to use either of these new modes (I also changed the material in this video, to a volumetric procedural brick texture, which is why it keeps looking like brick as it is destroyed). Since it’s not happening every frame, the physics cooking is actually quite snappy and I can’t say I noticed any real performance hit. Exciting!
A short note about the ‘Async’ variant. What this means is that the Collision cooking is done on a background thread and so it doesn’t block the game thread. This improves performance but the trade-off is that the updated collision geometry isn’t necessarily available immediately. As a result if you have quickly-changing geometry and fast-moving objects, they could more easily end up “inside” the generated meshes before the collision is finished updating.
Should you make your own Component?
This is a question that frequently comes up when looking more deeply into this problem of runtime-generated geometry. The most common case I have heard about is, you are generating meshes using an existing C++ library that has it’s own YourMeshFormat. You want to see this mesh in Unreal Engine. So as we’ve done in this tutorial, you are going to have to stuff it into a PMC or SMC to get it on the screen. This will involve one or more copies/translations of YourMeshFormat into something the Engine can ingest - either PMC Sections, an FMeshDescription, or now a FDynamicMesh3 with SDMC.
But if you dive into the PMC code, you’ll see that there is not much to the PMC and it’s SceneProxy. It won’t take you long to figure out that you could “cut out the middleman” and have a custom UYourMeshComponent that directly initializes the RenderBuffers from an instance of YourMeshFormat. In fact this is essentially what the SDMC does, where the alternative mesh format is FSimpleDynamicMesh3.
So, should you? My opinion would be, that depends on how much time you want to invest in saving a few mesh copies. If you have a large team of skilled engineers, it’s not a huge commitment, but you will have to do continual work keeping your Component up-to-date as the engine evolves. If you are a small team or indie, the small performance win may not be worth the effort. I would definitely want to profile the cost of the mesh copies/conversions, because in our experimentation, this has not been the bottleneck. Uploading the new render buffers to the GPU is still the main expense, and this doesn’t change with different Component types.
And if you organize your “mesh architecture” as I have in this tutorial, it wouldn’t necessarily matter - if you don’t depend on specific Component features, you could swap in a new Component type as needed.
(Addendum: khammassi ayoub has written a very detailed set of Medium articles about creating your own Mesh component - links here to Part 0, Part 1, and Part 2. However just a small note, much of the effort in that tutorial goes into being able to have a custom vertex shader, which is not necessary if you just want to make a “PMC but with my mesh format to avoid copies” Component. In particular you don’t need to make your own Vertex Factory/etc if you are just rendering “normal” meshes. But it’s a great read as he covers all the critical parts of Rendering-side Component/Proxy infrastructure)
Wrapping Up
That’s the end of this tutorial. I focused on Booleans here because they don’t require any parameter manipulation. However GeometryProcessing and the ModelingOperators module in the MeshModelingToolset plugin have operations like Extrusion, Offset, Bend/Twist/Taper space deformers, and more, that could easily be added to something like ADynamicMeshBaseActor and manipulated interactively in-game, with UMG or by in-world actions.
Although you could directly use ADynamicMeshBaseActor and the RuntimeGeometryUtils plugin, I really see this more of a guide for how you could build your own versions. If you are creating a game or app that involves storing content created at runtime, I would encourage you to spend some time thinking about how you want to organize this data. Storing the source meshes in the Actor was convenient for this demo, but if I were building something real, I would move ownership of those source meshes out of the Actor to some more centralized place, like a UGameInstanceSubsystem. It might seem like you can “do this later”, but if you build a lot of Blueprints on top of this current system, it will be messy to refactor later (I initially had ADynamicMeshBaseActor in the game folder, and just being able to move the .h/.cpp to the plugin without completely breaking everything involved spending an afternoon learning about Redirectors…)
It’s also not strictly necessary to have the separate PMC/SMC/SDMC Actors. Since I wanted to compare them, it was useful to split them up this way. But it would be possible to have one base actor that dynamically spawns the different Component types based on an enum. This might make life easier for working with Blueprints, as right now if you make a BP for the one of the Actor subclasses, and want to switch it to a different one, you have to jump through some hoops to change the base type, and you can’t share between multiple types (that’s why there are two shootable-wall BP’s in the tutorial, one for PMC and one for SDMC).
Finally I mentioned earlier that this will not currently work on OSX. That’s because of the USimpleDynamicMeshComponent - it is part of the MeshModelingToolset plugin, which depends on some editor-only modules that require third-party DLLs currently only available on Windows. It should be possible to get the ModelingComponents module that contains the SDMC working with some strategic #ifdef’s, but that would require recompiling the engine. A more immediate solution would be to remove ADynamicSDMCActor .h/.cpp and the “ModelingComponents” reference in the RuntimeGeometryUtils.build.cs file, and only use the SMC or PMC variants. I have verified that on Windows everything still compiles if you do this, which means it should work on OSX, but I have not tested it myself. (Note that this also breaks most of the sample project)
Thanks for reading! Don’t hesitate to post questions in the comments, or on twitter @rms80.